Sunday, July 31, 2011

Treestand Selection

Treestand selection can be vital to the success of your deer hunt.  There are many different types of treestands available on the market.  Ladder stands, hang-on stands, and even climbers.  Each stand has advantages and disadvantages and this blog will go through each of those.

Ladder Stands

Ladder Stand
Ladder stands can work in many scenarios, but the tree has to be pretty straight.  There are many different shapes and sizes, but a majority of ladder stands are 15-18 feet tall and most have a decent sized platform.  Ladder stands are probably the safest treestand to sit in during a hunt.  There are also ladder stands that can hold two people which is nice when taking a spouse or child to the whitetail woods.

The downfall of ladder stands is they're usually tough to hide in a tree.  They stick out a ways from the tree and it is tough to blend the stand into the tree; usually a few too many branches need to be removed to place a ladder stand in a tree.  The other downfall of a ladder stand is they can be difficult to put up on your own.  I definately recommend at least two people to help get a ladder stand setup.

Also, a ladder stand can be as cheap or as expensive as you want it to be.  It all depends on the features you are looking for in a ladder (platform size, height, seat, arm/foot rests, etc).

Double Ladder Stand
Hang-on Stand

Hang-on stands provide a lot of the benefits that a ladder stand does not.  Hang-on stands allow you to get close to the tree.  You can place a hang-on amongst branches for better concealment and climbing sticks are right up against the tree.  A hang-on can be hung by yourself; although it is a good idea to have another person with you just in case.  Some of the high-end hang-on stands (Muddy Outdoors or Lone Wolf) allow you to adjust to the shape of the tree.  Seat and platform leveling adjustments are key to being able to hang your stand in the right tree.

Hang-on Stand
The downfall of the hang-on is it can be a little more dangerous to get in and how of because when you climb up the tree, you are right against it, where as a ladder stand the ladder is more at an angle.  I highly recommend while hanging this type of stand to use a linemans belt with your safety harness to have the use of both hands.  Also, a product like a lifeline is a must when I use hang-on stands.  These allow you to always be connected to the tree when you climb.  Another downfall of a hang-on is the use of climbing sticks.  With a ladder stand, the ladder is included when you buy the stand.  When you purchase a hang-on, you must also purchase some sort of steps or sticks to get you up the tree.

Climbing Sticks
Climbing Stands

Climbing stands are great for backpacking into the timber, putting the seat and platform on a tree, and climbing the tree.  A climbing stand is similar to a hang-on, but you don't need the sticks.  A climber is also great because you can go up as high as you want.  I prefer a Summit climber because they are very comfortable and easy to use.

Climbing Stand
The disadvantages of a climber is that you need a very straight tree.  In the timber I hunt, a straight tree is hard to find.  The other issue with a climber is the fact that you need a very clean tree.  Since the platform and seat are connected to the tree, you cannot disconnect it to go around a branch.

I have used all three stands, and with a climber, there are a few things that are important to remember.  1) Make sure you are always connected to the tree when climbing, 2) make sure the seat and platform are connected by a rope.  Making sure these two are connected will allow you not to lose the platform if you feet slip out of the stirrups.  If you lose the platform, you will be dangling from the seat portion of the climber.

My personal preference is to use a Muddy Outdoors hang-on with cheaper climbing sticks.  This helps to keep my cost on the entire set lower, but also give me all the advantages of a premium hang-on stand.  I also like to have a packable stand and sticks so I can hang a set for one night to try to get on a big buck.  This year I will be using the Muddy Bloodsport and Muddy climbing sticks for my "run-and-gun" setup.

Next week I will put together everything I have been discussing over the past few months.......treestand location on the farm I hunt! 

Muddyhunter

Weekend Update

Spent all day yesterday at the farm in southern Iowa mowing some trails, checking cameras, and planting a food plot.  Here are some pictures from the weekend.

The eight pointer I got on camera two weeks ago keeps showing back up.  This is the only good deer I am getting on camera in the last month.  I have talked to some other folks and they are saying the same thing; no big bucks on camera lately.  I think this has to do with all the hot weather in Iowa over the past 2-3 weeks.


Because it is so dry, I was able to get a food plot planted this weekend.  I planted a brassica blend which should hold deer in the area.  I am planning to hunt this spot early this fall; it will be a perfect spot for an evening hunt with a south wind.

Disking
Disking some more


Spreading some seed
 
The finished product

 
To top off a great Saturday, my brother has been talking about buying a bow for a long time, and he finally did it!  Him and I went and checked out a few bows, he found one he liked, and that is all he took.  He will be addicted to bowhunting soon!

Only 70 more days until the Iowa opener!

Muddyhunter

Sunday, July 24, 2011

Land Management

Deer season is getting close.  By now your mineral stations should be established, and food plots should be established or being seeded (depending on the plot).  Besides mineral stations and food plots, there are a few finishing touches you can put on your hunting property to make it successful.

Mowing

Mowing trails can make a big difference in how deer move throughout your property.  I mow many trails around the timber edge and even in the timber.  Deer will take the path of least resistence just like a human, so if you can make a path that is easy to access and walk on deer will take it.  These paths are good locations to place a treestand.


Mowing trails
Mowing trails not only allow deer to travel more freely through your property, but also can provide easier access to stand locations.  Walking through head-high grass is never fun so a clear, easy path to a stand is much more desireable.  In the picture above, I am mowing a trail from one of the property entry points so I can walk around the property easier this fall.

Timber Stand Improvement

Clearing an area of timber is a good way to improve your hunting property.  The entire area does not have to be cleared, but getting rid of a few trees in an area allows the vegatation on the timber floor to grow, creating bedding areas for deer.

After

The picture above illustrates timber stand improvement.  All of the good, straight trees are left and the rest of the knarled up, smaller scrub trees are removed. 

My favorite outdoor writer Bill Winke has done a few blogs and videos on timber stand improvement.  Click here to view a video on timber stand improvement. 

Also, if you have not seen or heard of Midwest Whitetail; check it out.  Bill's show is awesome and him and his crew do a great job of bringing great hunts, as well as hunting and shooting tips and tricks.

Get ready for next week's blog.  The blog will be similar to the trail camera blog, but focus on treestands.  What treestands are out there, how to setup, and what I recommend.

Muddyhunter

Monday, July 18, 2011

Food Plots Part 2

It's time for Food Plots Part 2.  In this blog we will dive deep into which crop is the right crop for your area, as well as what it takes to grow each crop.  At the end, I will give my recommendation as to what my perfect food plot is.

Corn

Corn is a great crop to plant as a food plot.  It gives the deer a place to hide (which could limit deer sightings), gives deer plenty to eat, and can help hold deer.  Corn is a great crop to plant if you are bowhunting or black powder in the later season.  Leave the corn stand all fall, then drive your truck through the field and knock it down; deer are scavengers and like to eat off the ground, plus you will be able to see the deer better.  The downside to corn is that if you are in an area with many agricultural fields, especially corn, there is no point in planting it in your plot, unless you are hunting in the late season.  

Corn field
We know corn is a great food source, but what does it take to grow it?  Corn takes nitrogen, phosphorus, and potassium (N, P, K) to grow.  N is the most important nutrient in having a green, healthy crop.  Nitrogen is usually expensive as well, let alone if you have to fertilize with P & K as well.  Corn also takes a little more than a hand seeder to plant.  To have proper germination, it is helpful if you have a local farmer plant the corn for you (unless you have a planter).

With the invention of Bt and triple stack corn hybrids, pest control is pretty much a non-issue in corn.  The only pest that really needs to be controlled are weeds.  One pass of Round-up (make sure you plant Round-Up Ready corn) before canopy will ensure a clean stand of corn.  A four-wheeler and sprayer works great for food plots.

Four-wheeler sprayer

Legumes (Alfalfa, Clover, Soybeans)

Alfalfa
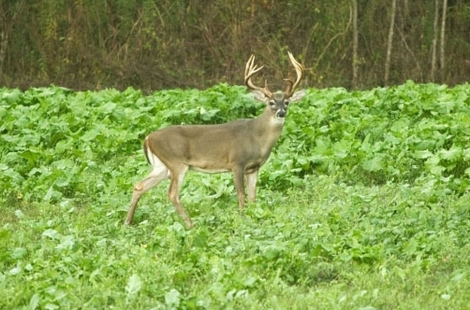
Legumes are a great crop to plant in your food plot.  Legumes are loaded with nutrients, especially protein.  Protein helps promote health and antler growth and will help to hold deer on your property.  Like corn, if there is an abundance of agricultural fields in the area, they may not be as effective during bow season.
Soybeans
Alfalfa, clover, and soybeans all produce nitrogen naturally, which makes them a great crop to plant before corn because you will have some nitrogen credit for the corn crop.  These crops do not need nitrogen to grow like corn does.  Legumes thrive in soils that have a neutral pH (around 7.0) and soils high in potassium; this makes soil sampling very important when planting legumes.

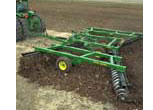
The optimal planting time for alfalfa and soybeans are in the April - June timeframe.  Soybeans later in the spring and alfalfa earlier.  Clover, on the other hand, should be frost seeded in March.  Frost seeding is the best way to get a great stand.  Frost seeding allows clover to germinate and grow before other weeds do, which eliminates competition.  Seeding beans, clover, or alfalfa can be used with either a drill/culti-packer type tool, spreading it on with your fertilizer, or hand seeder and then working it in with a light harrow.

Drill/packer
Weed control in soybeans is similar to corn; Round-up (again make sure to plant Round-up Ready beans).  In alfalfa and clover, you can really only control the grasses. I recommend a selective herbicide for grasses; Select Max is a great product to use for grass control.  Mowing your alfalfa and clover is also important.  This will help to eliminate some of the broadleafs as well as increase the growth of the crop.

There are also pest concerns, especially in soybeans and alfalfa.  Soybean aphids can devastate a soybean crop in a hurry.  These nasty little pests feed on the under side of the leaf and suck out all the starch and secrete it on the plant.  This makes the soybeans have a black look to the leaves.


Soybean Aphid damage

Soybean Aphids


Potato leafhoppers are a pest that can cause tonnage loss in alfalfa if not controlled in a timely matter.  Yellowing of the alfalfa plant is the main symptom of potato leafhoppers.

Potato Leafhopper


Potato Leafhopper damage


Remember, the clover and alfalfa will come back year after year, which is another benefit of these two crops in your food plot!

With the right amount of fertilizer and pH management, legumes are a crop that can make your property successful during bow season.

Brassicas
Turnip plot
Brassicas are crops like turnips and radishes.  These crops are something different for deer to eat, especially where you have farmers with corn, soybean, and hay fields in the area.  I have read many articles that talk about how deer like to move from one food source to another during the summer and fall.  Adding brassicas to the buffet is another way to hold and pattern deer on your property.

These crops are high in protein and highly palatable for deer, especially after the first hard frost of the year.  Deer usually will not touch brassicas until the frost, which is nice because the deer don't mow them off too early.  The frost will make the brassicas sweet, which we know deer like.  After the first frost, you better be in the stand over your brassica plot!

Make sure to check your pH before you plant brassicas.  Like legumes, brassicas flourish in a soil pH around 7.0.  Also, put down a little MAP and potash to help it out as well.

Hand seeding
Brassicas are an easy seed to plant as well.  A simple hand seeder that you can find at your local hardware store will work for planting brassicas.  Seeding before a rain is a good idea as well because the rain will help to incorporate the seed in the soil, or you can drag your food plot with a light harrow to incorporate the seed as well.  The brassica seed only needs a little dirt thrown on top to germinate.  I would recommend finding a blend of brassica's that will mature at different times.  This will allow deer to have plenty to graze on throughout the fall.

Bottom line, a food plot will help to hold deer on your property, especially if it is something that is not readily available in the area.  Deer need to eat during the rut as well, so if you can hold the does on your property because of the food, the bucks will be there too!

Let's take a look at one area of the farm I hunt.  I planted this field to maximize both my early season hunt, and my late season hunt as well.

My food plot
The areas in yellow I will plant turnips in late July or early August.  This will allow the deer to travel along the timber and get into the circle in the corner, which the turnips will be around 40 yards from my stand.  This also allows me to set a stand anywhere along the turnip path.  The red area is corn.  I will leave this standing all winter and black powder hunt.  The turnips provide protein and a alternative food source, while the corn will help the deer stay healthy and fat during the winter.

Next blog will be on land management and a few little things you can do besides food plots, minerals, and trail cameras to make your property the best it can be!

Muddyhunter 

Weekend Update

This past weekend I headed down to the farm to check a few cameras and refresh mineral sites.  Here are some pictures from this weekend!

Good thing we had the four wheeler....it was hot!!
Putting out some Lucky Buck


Deer are loving the Lucky Buck!
Setting up a camera


Good management buck


Good management buck!


I would have more deer pictures, but two of my best cameras had some SD card issues.  Tip for everyone out there, make sure you format your SD cards before you put them in the camera.  Otherwise you will not be able to view any pictures. 

The new Moultrie cameras are awesome.  Big improvement over the previous Moultrie's.  Higher quality pictures and more pictures with deer in them.  Plus, the smaller size is an added bonus.

Food Plots Part 2 is coming soon!

Muddyhunter

Monday, July 11, 2011

Food Plots Part 1

First off, I thought I would "jazz up" the name and logo of the blog to Bone n' Broadheads.  I think its much better than the previous blog title.  Anyway......

I was going to discuss land management in this blog since I have already blogged about mineral stations and trail cameras which are both part of land management.  Food plots are also important to whitetail land management, but there is so much information to share I am going to do a two-part blog about food plots.  Part 1 will focus on what it takes to get your food plot ready to plant.  Part 2 will focus on planting, which crops to select, and how to manage the crop after it is planted.

Food plots can add another dimension to your hunting property.  Almost any part of your property that can get some sunlight could be a food plot.  You may have the best ground in the world, but without food the deer will vanish.  Being an agronomist (I used to work at a Co-Op), this blog will give you some suggestions on food plots.

Clover food plot
Food plots can help you be successful come deer season because of a food plots ability to hold big bucks in an area.  There are a variety of crops you can plant, and I will discuss the benefits of each with you (Part 2), but first let's talk about what it will take to grow any crop.

Field Preparation

Field preparation can be done in a number of ways, or you might not have to do any at all.  Once the spot is located you want to plant, start by looking at what is already there.  If the plot is currently grass, it may be a good idea to go in and mow it off.

Brush mower

After mowing the spot, let it sit for a week so the grass and weeds can recover and start growing again.  Once the week timeframe has gone by, get your sprayer out and spray the area.  The reason you need to wait until the mowed area starts putting growth back on is because those plants will not take in the chemicals if they are not actively growing.  I recommend spraying a Round-up and 2-4,D mixture.  This will take care of the broadleafs and grass in the field.

Four wheeler sprayer
Wait another week after spraying before doing some tillage.  Working the dirt will allow for a better seedbed for planting and will bury the dead weeds.  I recommend some sort of disk/harrow tool to work and level the soil profile.  Use a four-wheeler or have the neighboring farmer come over and disk it up.


Disk
Fertilizer
Fertilizer is a key component to food plots.  Nitrogen, phosphorus, and potassium are vital ingredients in most crops to make a successful food plot.  Common forms of fertilizer are: 

Nitrogen
  • Gas (Anhydrous Ammonia) 82-0-0
Anhydrous application
  • Liquid (28% or 32%) 28-0-0 or 32-0-0
  • Dry (Urea) 46-0-0
Phosphorus
  • Monoammonium Phosphate (MAP) 11-52-0
  • Diammonium Phosphate (DAP) 18-46-0 
Potassium
  • Potash 0-0-60
The first number in each analysis is nitrogen content, the second is phosphorus, and the third is potassium (N, P, K).

pH is also important and can be managed with lime applications.  A proper pH is important because it will help utilize the fertilizer you apply more efficiently and a proper pH will allow for higher yields.  There are certain crops that require more of one fertilizer than another, and other crops that are more pH sensitive.

Soil sampling can be used to determine what to spread for the desired crop.  The soil samples can be sent in to a lab and a specific recommendation is given based on the crop you are going to plant in your food plot. 

Soil sampling
How much should you soil sample?  That depends on how accurate you want to be, but if I was going to plant an acre food plot, I would split the plot in half and take 6-8 soil cores (the cores make up each sample) from different spots in each half.  This will give you a good idea of what nutrients and pH characteristics your soil has.  Remember, try to sample around 12" deep to get the most accurate nutrient readings.  Check with your local cooperative for soil sample bags.

Fertilizer buggy
How do you know what to spread?  Your local fertilizer salesman or Ag cooperative will be able to help you understand your soil test results and give you a recommendation.  You can rent a fertilizer buggy from the local cooperative to spread the blend on yourself, or you can have them do it for you!   

Now your food plot is ready to be planted, but what should you plant and how should it be planted?  The next blog "Food Plots Part 2" will compare and contrast different crops and how they will affect your whitetail property.

Muddyhunter

Tuesday, July 5, 2011

Bowhunting Fitness

It's time for the fourth installment of Bone n' Broadheads.  Let me start by saying I am not a fitness expert (unlike Ron Burgendy), but I do workout and I think there are a few things that I can share to help you this fall.

"Deep burn!"
Bowhunting fitness is a topic that gets lost in the mix of practicing for deer season and managing your hunting property; but that does not mean it is not just as important.  This blog is going to focus on what it takes to get in shape for bow season.

My friend Tom Henrich who is an avid bowhunter and fitness fanatic is going to help me out by showing us what it takes to get your muscles into shooting shape. 

Tom shot this great buck with me last year in southern Iowa at LJS Hunting Lodge.  He watched it breed and chase a doe for almost an hour before he got a shot.  Tom said the buck was breathing heavy and slobbering, and when we went to gut him, I understood why....the buck had plenty of hair rubbed off in certain areas!

Tom's 2010 Iowa Buck
Looking at the picture of Tom (below) you can see the red circles showing where it is important to build muscles for archery. 


Building muscles in your upper back, shoulders, and arms will allow you to hold steadier and use your back muscles to "pull through" the shot, resulting in better form and a suprise release.  During bow season, I do plenty of walking to get to my tree stand, so increasing my cardiovascular activity is also important when building these muscles.

Back

Lets start with back muscles.  There are many different exercises that will help you build your back muscles, especially the latissimus dorsi and trapezius (below).


Latissimus Dorsi (largest back muscle)

Trapezius


1) Lateral Pulldown


Lateral Pulldown


2) Rowing

Seated Row
There are a few different variations of rowing, but above shows the basic technique.  I like to row standing up with a barbell with added weight and start with the barbell at my waste and bring it straight up to my chin.

Shoulders

Now that you know a couple lifts to help out your back muscles, lets think about bulking up your shoulders.  The exercises below work a few other muscles, but I want to focus on the deltoid muscles in your shoulder.

Deltoids
1) Lateral Raise

Lateral Raise
2) Shoulder Press
Shoulder Press
Similar to the row exercise, the shoulder press can be done on a machine (above) or by using dumbells.

Arms

The final red circle on Tom shows his arms, more specifically his triceps and biceps.  Here are a few lifts to help those areas.


Triceps
 
Biceps


1) Tricep pushdown
Tricep Pushdown
There are other exercises to work your triceps (dips, tricep extension, etc), but this is one of my favorites.

2) Bicep Curl

Bicep Curl
Like the tricep exercise above, there are different variations of the bicep curl.

My workout routine includes all of the exercises above, plus a few extra like bench/incline press, squats, calf raises, and chest fly.  I workout 4-5 times/week, and focus either on chest, shoulders, and back one day and the other biceps/triceps and legs on the other.  I start out running 5 minutes and then do one rep of each lift.  I do this routine a total of 3 times.  I try to limit downtime between lifts to keep my heart rate up.  I recommend doing these types of lifts with free weights if possible.  Dumbells will help to strengthen your stabilizer muscles in your back and shoulders better than machines will.

I also use the Full Fitness app on my iPhone to build a workout and keep track of meals and track weight loss.  Full Fitness's website breaks down each exercise by body area, and has pictures that show proper technique for each lift.  I recommend using some sort of program to get started and create a workout to meet your needs.

The next blog is Part 1 about Food Plots and what it takes to make a good food plot!

Muddyhunter